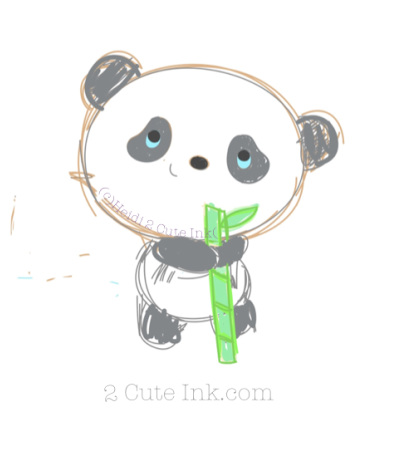
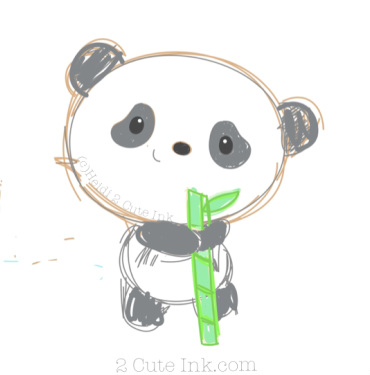
So one thing this year is to do MORE sketching. I created this cute little duck holding an umbrella and I thought I would share! Who knows this little guy may just get turned into digi stamp! I just love how sketches look…I am thinking I need to do something with them, what do you think?
I have seen "Grab My Button" codes on other digital stamp blogs a while now and always wanted to have one made for my 2 Cute Ink digital stamp shop. Since I have been updating everything about 2 Cute Ink I thought why not update my logo badge and figure out how to create a Grab My Button code. My artsy friend Patti from Pholk Art Studios posted a link on Facebook to a "Grab My Button" Code generator. I clicked on it and it was exactly what I needed to make my code button for my blog. Now you have to do a few things in order to make your button code so I thought I would create some directions so everyone can learn how to make one. Steps To Create A Grab My Button: Step 1. Create a button using a program like Photo Shop. Make sure the width does not exceed 2.5 or it may get cut off in your blog's side bar. I had to use 2.4 for my width in my weebly blog because 2.5 width was a tad to wide. I created my button big and then scaled it down to 2.17x2.4 and it fits just perfect in both my weebly and blogger blogs. Step 2. Login into your Pinterest and Create a New Board ( I created a secret board). Step 3. Fill in the Info to create your board. Step 4. Click the "Add Pin" Button. Step 5. Click " Your Computer" to upload your button image. Step 6. Find your button image on your computer. Step 7. Click on your button image that is now in your board. Step 8. Now Click the Image Button on the top Step 9. Highlight all the URL of your image and press copy. Step 10. Go to GrabMyButton and paste your URL in the "Your Image URL" box. Step 11. Scroll down and hit the "Preview" button. Step 12. Look and make sure your button image appears and is not blurry, then hit the green "Get Code" button. Step 13. Now highlight ALL of your code and Copy. Step 14. In weebly grab the "Embed Code" widget and place on you side bar, hit paste and you will have your button! Step 15. In Blogger add the HTML/JAVASCRIPT widget, paste the code and there is your button. I hope you enjoyed learning how to create your own button so you can add it to your blog! :)
I started off today with a sketch session! I came up with this cute Panda holding bamboo and thought he may be cute as a digital stamp and had to share. I love being able to add some color and be messy with my sketches when I sketch in adobe ideas. I played with the eyes a little bit, I think it would be cute if I added a little ladybug on top of the panda's head like he is looking at it. Below I just colored the entire eye black and now the panda is looking straight!
So since I have started this NEW blog just for digital stamps I wanted to re-share how I ink a digital stamp in Adobe Ideas. I ended up making this a two part video since I think I ran out of battery when I filmed the first video. lol I would really like to make a few more videos showing, "How to Draw", "More Inking" and anything else I can think of. I am not the greatest at videos but I love to share things. |
Welcometo 2 Cute Ink! Where I share my digi's, doodles, crafts and more!
I hope to inspire you with my arts and crafts! Heidi Digital StampsCategories
All
|